Wednesday, March 6, 2013

Recovering from bad overclocking settings

My android phone is nearly three years old, it's a tiny thing from the days before screen sizes started growing ridiculously large.

I've held onto it because I don't like large phones, the problem is that it is quite underpowered by today's standards: 600 MHz cpu, 256MB of RAM.

Sony Ericsson stopped upgrading this phone at Eclair, but thanks to the dev community, I'm currently running Jelly Bean 4.1.2 on a custom kernel.

Tweaking my phone has become something of a hobby and in an effort to squeeze every drop of performance out of this old hardware I sometimes experiment with overclocking the processor.  This kind of customization is built right into the Cyanogen ROM (presuming your kernel supports it), and the settings page comes with a big warning.


It is a very good idea to not select "Set on boot" until you know that the settings you have chosen will not crash your phone.  If bad settings crash your phone and are restored on boot, then you can end up in a crash/boot loop.

So, one night I noticed that a recent kernel upgrade had increased the upper limit for the maximum CPU frequency to 864MHz.  With total disregard for the consequences, I decided to try this out and forgot to unset the "Set on boot" option.

864MHz is too high and the phone crashes after about 10 seconds.  After rebooting, you have again maybe 10 seconds before it crashes again.  This is not enough time to get back to the settings page and restore things to working order.

Unfortunately, the last full backup of my phone was about a week older than I liked and I really didn't want to lose the changes I had made since then by doing a restore.

The first step towards fixing this problem was to look at the source code for the settings app which is available on github.  A peek at Processor.java reveals the relevant preference keys:
    public static final String FREQ_MIN_PREF = "pref_cpu_freq_min";
    public static final String FREQ_MAX_PREF = "pref_cpu_freq_max";
    public static final String SOB_PREF = "pref_cpu_set_on_boot";
We can see in BootReceiver.java that those preferences are read on boot and applied to the cpu.


Step two is to boot into CWM recovery and mount the /data partition.  On my phone you can enter recovery by repeatedly pressing the back button when the kernel boot animation first starts up.

Connect your phone to a pc via USB cable and start an adb shell.


The settings app will be storing its data under /data/data/com.android.settings:
/data/data/com.android.settings # ls -la
drwxr-x--x    1 system   system        2048 Mar  2 02:32 .
drwxrwx--x    1 system   system        2048 Mar  6 05:01 ..
drwxrwx--x    1 system   system        2048 Mar  2 04:04 cache
drwxrwx--x    1 system   system        2048 Mar  2 02:37 databases
drwxrwx--x    1 system   system        2048 Feb 26 05:15 files
drwxr-xr-x    1 system   system        2048 Feb 26 04:59 lib
drwxrwx--x    1 system   system        2048 Mar  6 16:34 shared_prefs

/data/data/com.android.settings # ls shared_prefs
CMStats.xml                   com.android.settings_preferences.xml

Initially I was expecting to have to break out some sql and modify database files, but the com.android.settings_preferences.xml file immediately caught my eye. grep shows us the cpu preference settings there in plain xml.

/data/data/com.android.settings/shared_prefs # grep pref_cpu com.android.settings_preferences.xml
<boolean name="pref_cpu_undervolt" value="true"/>
<string name="pref_cpu_freq_max">864000</string>
<boolean name="pref_cpu_set_on_boot" value="true">
<string name="pref_cpu_freq_min">122880</string>
<string name="pref_cpu_gov">smartassV2</string>
While we are still in the adb shell we can also check to see what the valid frequency values are:
~ # cat /sys/devices/system/cpu/cpu0/cpufreq/scaling_available_frequencies
122880 245760 320000 480000 604800 614400 633600 652800 672000 691200 710400 
729600 748800 768000 787200 806400 825600 844800 864000
All that remains is to adb pull the file to the PC, modify the pref_cpu_freq_max setting to something more reasonable (729600), and then adb push it back to the phone.

Wednesday, May 23, 2012

Carving Countries

After finishing up the fiberglass sphere that will become the globe, we are almost ready to start carving countries.

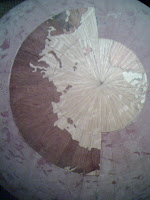
First two sections of the Arctic ocean
The first step was to trace out a grid.  With the help of a protractor and flexible plastic spline, I drew lines every 15 degrees latitude and 10 degrees longitude.  These lines every 10 degrees longitude correspond to the edges between the 36 gores on the map I am using as a template.

Each cell of this grid becomes one section that will be carved out of wood veneer.  I bought an assortment of domestic and exotic wood veneers which provide ample selection for coloring the countries.  I also bought sequence-matched white oak for the water.

Tracing countries
The general process for a given cell is to use carbon paper to trace out the largest piece of country in that cell onto the selected piece of wood veneer.

Using a rotary tool, carve out the shape of that piece.  This then serves as an edge guide when tracing the next piece in the cell.  Small errors accumulate and result in subtle shifts of various borders; hopefully nobody notices.

The carved pieces are glued to each other, and then once a cell is complete it is glued onto the sphere.With time and patience you slowly get something that becomes recognizable.

Wooden Globe, North Pole Wooden Globe, North Pole Wooden Globe, Arctic Circle


These pictures represent approximately two years of work. The final picture below is the current state of the globe as it sits in my basement.
 
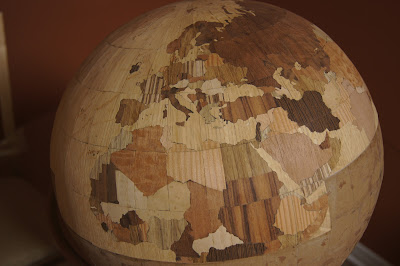
Wooden globe, Europe and Northern Africa
Not quite half finished

In retrospect, I am not entirely happy with my choice of woods on some of the countries.  For example, Britain really should be a darker color to contrast more with the ocean.  I find the striped veneer used on France and Poland tends to clutter Europe a little and a solid color would have been better there.  The stripes in Sudan really should have been aligned between the two cells.  However, due to the time invested here, I'm not inclined to go back and attempt to redo these pieces.

Hopefully the southern hemisphere won't take as long.  The hardest part is done, however all the islands in the south pacific will present their own special challenge.

Thursday, April 26, 2012

Wooden Globe, fiberglass edition

So I decided to build a globe.  After figuring out the maps, the next step was working out the structure of the globe itself.  My general plan is to glue wood veneer onto the surface of a sphere, so obviously the first thing I need is a reasonably sized sphere.  I wanted my globe to be relatively large, on the order of 16 to 18 inches in diameter.

My first thought was a sphere made of wood.  It turns out that making a wooden sphere of this size is an art in itself.  While you may be able to buy a wooden sphere, a large one wouldn't be cheap.  I considered plastic,  but was worried about how glue would work on that kind of surface.

I eventually decided to make a sphere myself using fiberglass.  So I went down to the toy store, bought a 16" diameter red rubber ball, and covered it in fiberglass cloth and epoxy resin with a structural filler.


The ball had Spider-man on it.


To support the globe, I bought bearings and a 3/8" brass rod.  I cut the globe in half and removed the remnants of the rubber ball.  Then I mounted the bearings in blocks of wood at the north and south poles. 

Spider-man left his mark.
North pole is at the bottom of the photo.

The bearing at the north pole is entirely internal to the globe.  The bearing at the south pole where the supporting rod enters will be the only opening in the globe.  Gluing the halves back together with some more epoxy and filler leaves us with a sphere free to rotate on its axis.


Tuesday, April 17, 2012

The start of making a wooden globe

I always liked globes. A few years ago I got the idea to make one out of wood and I actually started this as a project. Now I'm making a belated attempt at documenting some of this process.

Making a globe has to start with a map.  The best source I had for this was Google Maps, so I painstakingly took screenshots and merged them together to create a map of the world.


Google Maps uses a Mercator projection.  Before it can be useful as a template for making a globe, it needs to be massaged into a shape that we can trace onto a sphere.

A gore is a segment of a three-dimensional shape fabricated from a two-dimensional material.  We need to transform this Google map to look something more like this:

The gores of Waldseemüller's 1509 globe of the world

First, transform to a equirectangular projection.  I did this using a photoshop plugin called Flexify 2 which I was able to get to run under GIMP.


I found a page which has a satellite image of earth with 12 gores (as well as images for other planets), but I want political boundaries for my globe so this doesn't help.  However, that page also has a link to a perl script which can transform an image into gores.  I used this perl script to generate a map with  36 gores.


With some careful scaling, this can then be printed and traced onto the surface of a sphere using carbon paper.